Keen to up-skill in musculoskeletal (MSK) ultrasound but don’t know where to start? Know you’ll need to pick up the skills, but struggle with access to a machine & supervisor?
Learning MSK Ultrasound can be a daunting process, and often looking at still images in textbooks doesn’t help. In this blog, you can find top tips from those who have either been through the process, or are currently trying to gain experience and mastery of this complex skill!
A huge thanks here goes to Chris Myers, and the Sports Medicine Ultrasound Group (SMUG), who have made a lot of these resources available free-of-charge. For more information about SMUG, you can check out their website here, and a link to their 2021 conference is at the bottom of the page.
5 Top Tips (with content taken from this SMUG blog with permission):
1. Know what you expect to see when you put the probe on (don’t just blindly hope the anatomy introduces itself!) You should be able to draw a picture of what you what you want to visualise before you put the probe on that structure (in both long-and-short axes), and where you’re going to be looking for pathology. You don’t need a machine for this part, and so even before you’re on a course, you can construct a list of structures you’re going to tick off, and a protocol for each joint. This way, when it comes to getting hands on with a machine and a tutor, you will be able to make the most of the opportunity, and concentrate on mastering the motor element of the skill. In terms of inspiration or for cues for each joint/structure, the 2-minute synopses below are a great place to start!
2. Scan ‘normals’
Seeing pathology on ultrasound is very exciting and of course is the end goal. However, if you don’t have an appreciation of what normal anatomy (or the spectrum of ‘normal’) looks like it is very difficult to identify pathology. SMUG advise that you initially scan lots of ‘normal’ and start to develop a ‘reference library’ of what ‘normal’ anatomy looks like.
3. Log your scans from Day 1
It is important to log your scans. This will help to structure your learning; reflect on scans and document evidence of your learning. Whatever your discipline you must be able to provide a portfolio of evidence. Don’t wait 6 months to develop your scanning skills and then start logging your scans!
4. Take time developing your probe skills – remember MSK USS is a motor skill first!
Chris Myers: “We teach thousands of practitioners every year and I observe many clinicians who are very competent at scanning, but it is the probe skills that separate the good from the great! Many people can scan using protocols and produce clear images, but it is the ability of a clinician to scan a structure and follow it wherever it goes that really tests their probe skills and their ability to produce a clear image for diagnosis. Once you have the probe skills you just find it and follow it!”
Here are some simple tasks you can do to skills to improve your probe skills:
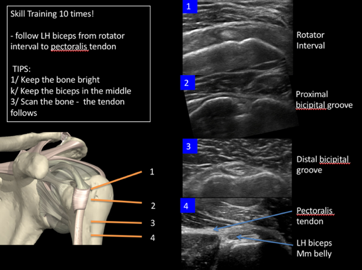
- Find the long head of biceps in transverse section in the bicipital groove and rotate into longitudinal section. You must keep the tendon in the middle of the screen as you rotate. Repeat 10 times (but ensure you keep the tendon in the middle, if not, stop and try again).
- Find the long head of biceps in transverse section in the bicipital groove and follow it from the pectoralis major tendon into the rotator interval – repeat 10 times. Remember: Keep the bone (humerus) bright throughout. As Mark Maybury, one of the SMUG tutors says “Keep the bone bright. Soft tissue right’. It’s a simple rule but is very important in MSK scanning as tendons often sit or wrap around bones.
- Find the medial nerve in the carpel tunnel and follow it proximally to just above the elbow. Ensure you tilt the probe to avoid anisotropy so you can see the ‘honeycomb’ appearance of the nerve and slide the probe on the skin forwards and backwards to keep the nerve in the middle. Whenever scanning a nerve ensure you use light probe pressure and lots of gel.
- Find the peroneus brevis tendon in transverse section just above the lateral malleolus. Remember brevis is closest to bone – ‘b’ and ‘b’ (easy to remember!). Follow the tendon keeping the bone and tendon bright as it wraps around the lateral malleolus. Continue to follow it distally until it attaches on the 5th metatarsal. It can get tricky to follow as it wraps around the bone. At this point the tendon changes direction (nearly 90°) so the probe position must reflect this. Key tips as it wraps around the bone – use lots of gel and keep the bone bright!
5. Get your hands on some key resources
There are lots of free resources on the internet for both beginner and advanced levels. As a starting point for anyone wanting to learn diagnostic ultrasound we recommend that anyone with an interest downloads the free ESSR guidelines for each joint print them in colour, laminate them and keep them in your clinic room. They give a basic protocol to follow and cover the key anatomy for each joint.
Hip: https://essr.org/content-essr/uploads/2016/10/hip.pdf
Knee: https://essr.org/content-essr/uploads/2016/10/shoulder.pdf
Ankle: https://essr.org/content-essr/uploads/2016/10/ankle.pdf
Shoulder: https://essr.org/content-essr/uploads/2016/10/shoulder.pdf
Elbow: https://essr.org/content-essr/uploads/2016/10/elbow.pdf
Wrist: https://essr.org/content-essr/uploads/2016/10/wrist.pdf
One thing we have not covered here, is at what stage you should invest in a machine, and what type of ultrasound machine to get. SMUG cover this topic in more depth in their blog, and also review many of the publicly available machines on their website.
Want to learn more?
SMUG MSK Ultrasound Virtual Conference 2021: https://www.eventbrite.co.uk/e/smug-msk-ultrasound-virtual-conference-2021-tickets-147942101809
Blog written by Dr Steffan Griffin (BJSM), with input and expertise provided by Chris Myers.