by Mark Harvey, Media Development Officer, Velindre Cancer Hospital, Cardiff
and Mark Taubert, Consultant in Palliative Medicine and Honorary Senior Lecturer, Velindre University NHS Trust


Lessons learned from using 360 video in palliative care and oncology settings
Introduction:
In 2017 and 2018, a virtual reality (VR) library was created in a teaching hospital in Cardiff. Teaching videos were filmed with a 360 degree camera, creating an immersive tutorial room environment. A radiotherapy session from a patient’s point of view was filmed, to demonstrate to viewers what radiotherapy looks like. Since then, several other videos and tours have been filmed, including one introducing the nearby Marie Curie hospice. Here, we outline what we learned during these two years. We make no excuse for geeking out with a fair bit of technical jargon, but readers who are looking at investing in a 360 camera and Virtual Reality Equipment may find this useful before they commit to a camera or other product.
Overview.
Virtual Reality (VR) has become a new and exciting way of engaging with people. Using smartphones, tablets, computers and VR headset devices it is now possible for people to experience much more engaging media than standard video. Doing a tour of a hospice, escaping to a relaxing woodland or walking on a street in Blackpool that you last visited as a child, are all achievable from the comfort of a hospice bed or home. However, 360 video presents a number of challenges that need to be considered when attempting to produce you own VR content. If you are new to 360 and VR but are keen to explore options for your healthcare organisation, hospital, or hospice, here are some tips on what we have learned in the last year.
Why 360, why VR?
Lots of people are now jumping in on this new technology, but be very clear why a fully immersive environment is better, than a two-dimensional video. Note that you can film in 360 but still view it on a normal screen as well
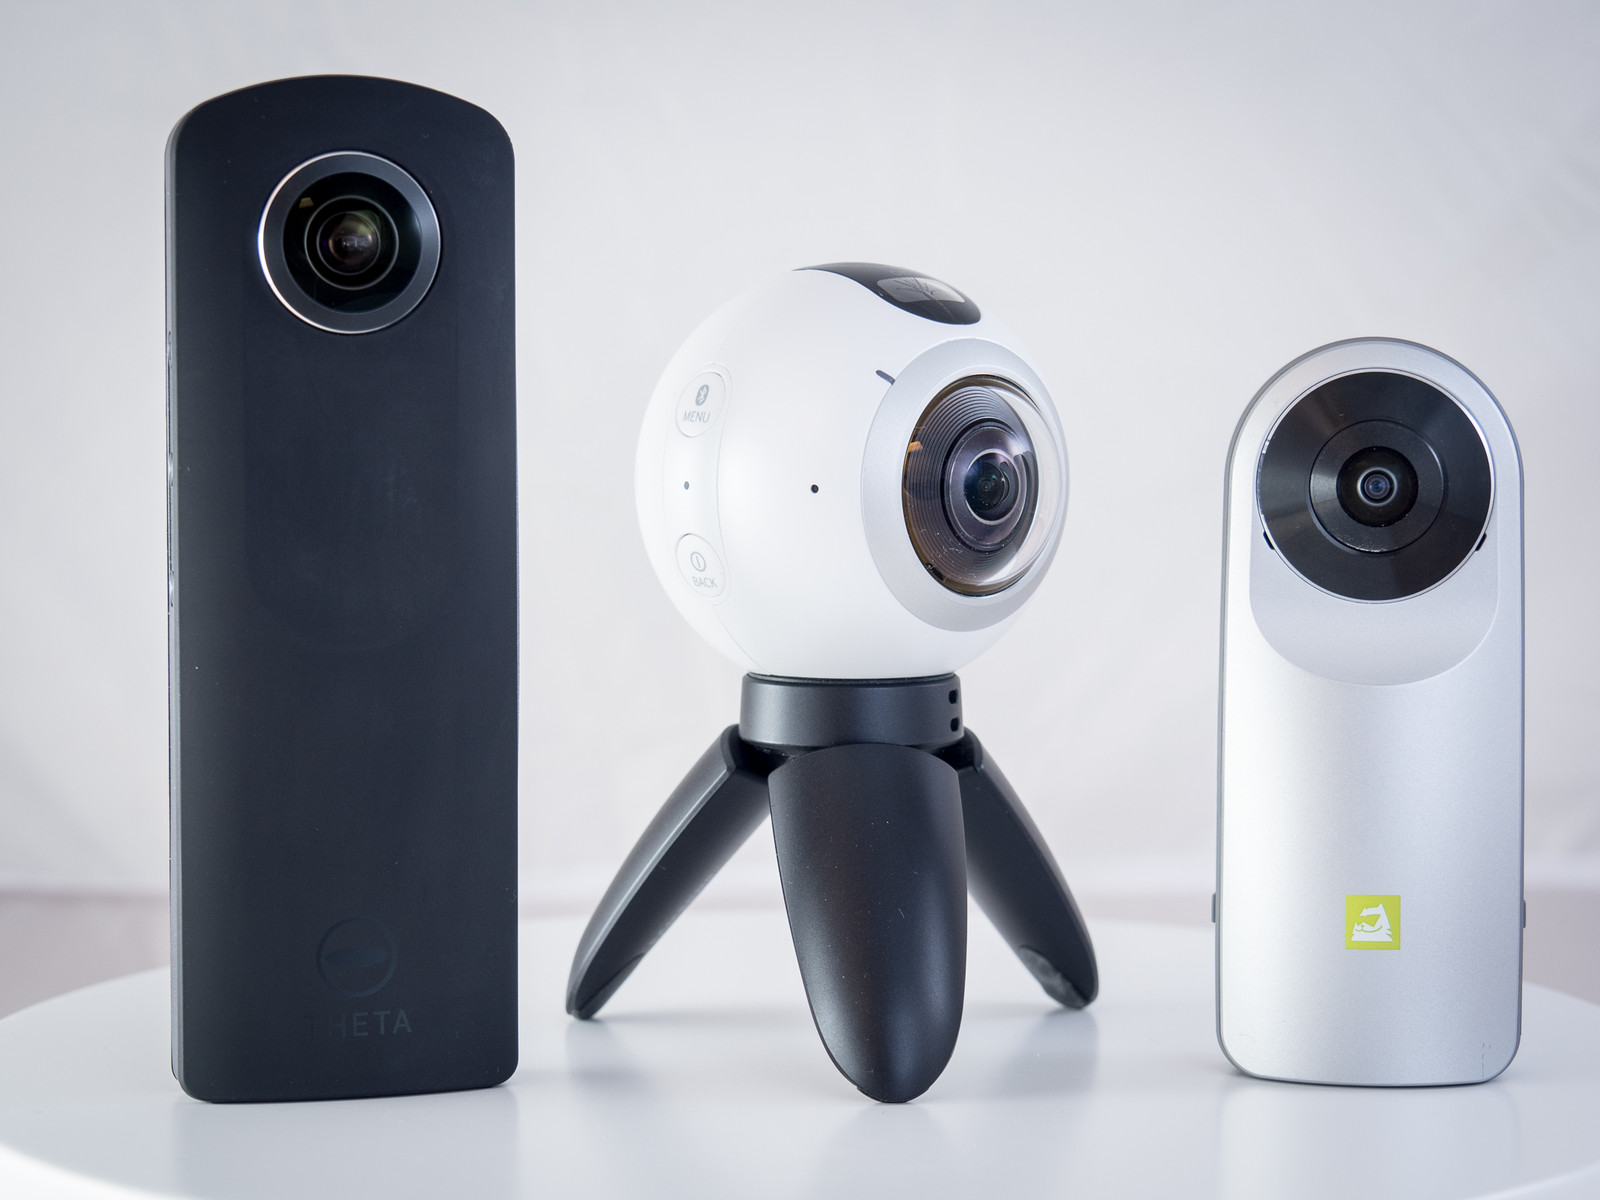
Camera choice and quality
There are 360 degree cameras that cost only about £90. We suggest that camera’s need to have a minimum recording quality of no less than 4K resolution. This can be achieved by most modern consumer (entry) level cameras on the market today. Whilst 4K resolution is currently the default expectation (as of September 2018), 4K resolution within 360 degrees is more akin to 720p video from the late 1990’s. Camera’s with higher resolutions (5.7k and 8K) are available and these do provide a clearer viewing experience, but the subsequent processing power required to work with these videos and their subsequent bandwidth requirements can leave viewers waiting for files to buffer when downloading, negating any improvement in video quality. Until such time that bandwidth speeds increase, 4k resolution appears to be the most reliable platform as of 2018.
User experience
Whilst it is great to experiment with 360 video content and to be able to point out items to users that could be behind them, or to their extreme left or right in the VR environment, for anyone sat in a chair or lying in a bed, this can also be extremely annoying. Experience suggests that most people will accept content that is contained within their cone of vision (usually around 60 degrees), or, outside of this, up to about 120 degree field of view. Anything beyond this requires the user to be able to rotate their head, neck or body to view the content which for the elderly, injured (spinal cord compression) or mobility impaired is not ideal and potentially painful/hazardous.
Camera positioning – bearing in mind the above, we have found it best to:
- Consider what it is you are trying to video. If it is a machine e.g. a radiotherapy linear accelerator in a cancer hospital, then the camera may be best placed nearby, or at an angle with the narrator pointing out the various salient areas of information. If you are trying to convey what a ward, waiting room or garden might be like, then it is perhaps better to position the camera front facing to where the person may be able to get the best view of the general scene e.g. you are not wanting them to have to turn around too much.
- Light sources. If your camera is a dual lens varian,t then try and split the view so that each lens gets access to a balance in light sources. e.g. the sun to both lenses. If you have one lens on the dark side and another facing the bright light, there will be a lighting variance as each lens uses a different exposure level from its neighbour which will appear in your finished media.
- Seam or stitch lines. Try to avoid important details crossing the stitch/join line. As each lens captures half the view their will be a join line (usually blurred) where the camera has done its best effort at bringing the two half of the image together.
- Camera position height. Try to keep the camera at head height or eye level with anyone in the video, as this will feel normal to the person viewing your video. If the camera is placed too low, people standing around the camera may look like giants, and similarly a camera too high will make the people look small and the viewer won’t feel part of the scene (unless a high/low viewing angle is required of course).
- Keep the camera upright. Our brains are hard wired to see the world from an upright perspective. If your camera is at an angle, then this will only lead to an uneasy feeling by anyone viewing your content. If you are recording motion video at an angle then this is also highly likely to trigger feelings of nausea. Setting your camera upright is not always easy to achieve, but if you are using a selfie pole or similar, try and stand back and view the pole/camera from many angles.
- People lying down (e.g. patients in beds) may not be able to view your content from that angle. Most VR headsets have built in gyros that recognise up from down and therefore set the view to that starting point. You may find that your content becomes unusable in a VR headset by those confined to a bed who are looking towards the ceiling when their headset is on.
Camera mounting
VR cameras should come with standard tripod attachment threads. Some 360 cameras will also have some form of basic (usually) mini tripod. These can be useful, but impractical for most recording environments. We have found that the purchase of a basic selfie stick combined with a mini tripod is sufficient for desk based recording. However when trying to record using this method standing a selfie stick on the floor, the results are far from satisfactory as the selfie stick is simply not tall enough.
A standard photography tripod provides a good solid base and can usually reach an acceptable height, but the base will display prominently in all your content which can be prove distracting. To remedy this, we use a photographers extending pole, which we attach to a micro tripod based. This allows for the camera to operate at an acceptable height whilst also minimising the tripod interfering too much in any recordings/photographs. Whilst this combination works well for indoor (controlled environments) if you are hoping to work outside then the micro tripod base is simply not stable enough in wind prone conditions or uneven surfaces, with the result that we have seen many Facebook questions about replacing broken lenses from people after their cameras have been blown over.
If you are aiming to undertake work outside in gardens or general external site environments, then we would suggest either a photographer’s lamp tripod with suitable camera attachment thread at the top or the extending pole mounted onto a standard tripod head. Both have far greater stability at the base and can be weighted if necessary, however we would strongly suggest not extending the photo pole as this will put too much strain on the threaded attachment to the tripod, which could ultimately fail resulting in devastating damage to the camera.
Camera Control
Most cameras can be controlled by smart phone apps. In such cases the app can access a range of features that will make the manual control of the camera easier. Apps generally allow the user to alter the exposure value, ASA, shutter speed and preview the scene before recording. They will also normally allow recording to be started and stopped remotely.
Camera power/battery
Camera power can range from between 35 minutes to an hour. Some cameras have interchangeable batteries, whereas others do not. If using the latter we have found that the purchase of a standalone powerpack can be useful to give charges between shots. It is possible to connect some cameras to external power e.g. Ricoh Theta V to provide for longer/live streaming.
The Xiaomi Sphere 360 and Ricoh Theta V have built in batteries. Some devices have an interchangeable battery, but it should not be ‘hot swapped’ during a recording for safety reasons.
File transfer to computer and visibility in headset
Most cameras should connect via USB or by using external card readers without too much hassle. If you need to write files to external non-encrypted devices, then you will need to contact/observe local ICT controls. At our hospital we have an iMAC, which can connect to the devices and manage file stitching/uploads to web or external devices as required. It is important to note that some files, for instance those for Oculus rift, needed to have a file extension (_360) written into their file name to be viewable via the Oculus headset. We spent some time searching for files in the Oculus headset until we realised our omission.
File stitching – joining of the hemispherical images/video into one space
This is the process of putting all the pieces of the image puzzle together into a full 360 environment. Mobile apps will normally provide a level of joining or ‘stitching’ as the term is generally known. However whilst this is possible, some apps may reduce the image size/quality in order to make the files web friendly. We prefer stitching on the computer as this is generally faster and means the files should remain at their recorded size. The camera supplied will usually provide access to an application that can be downloaded free of charge. Installation of this application will need to observe local ICT policies /guidelines. It should be noted that not all camera manufacturer’s support Apple computer system. Most however will support Windows (currently version – 10) operating systems.
File sizes
4K 360 videos can become unwieldy if you are trying to edit from a network resource. We have found the network speeds can vary and that editing can become tricky if network traffic is busy. We prefer to transfer a master copy to network drives and then work from local copies. This provides faster access to the files and also secures a master file onto the network should the PC crash or files become corrupted (hasn’t happened yet). File sizes are dependent on duration of video clips, but as an example, a 3 minute 20 second clip results in a file size of 1.48GB. A 25 minute teaching session would normally record in 4GB chunks due to the windows operating system limitations. Each segment needing to be stitched and compiled in a video editing application.
Audio
360 cameras will typically have microphones built into them. These provide basic recordings but will tend to pick up all sorts of ambient sounds. If you are recording a procedure with a narration, it can be very useful to use a separate voice recorder and/or clip on lapel microphone. It is useful to note that Dictaphones should be avoided as the quality can sometimes be low. We have used Tascam voice recorders such as the DR-05 to good effect. These provide excellent clarity yet are light enough to be carried in a pocket or held in the hand.
Narrations can easily be added as a separate audio source within a video application and this can be done from your own software application.
Additional developments of note
Camera technology in this sector is changing rapidly and of note is Youtube’s support for 180 virtual reality video using 3D technology. We will be looking further at the VUZE 180/360 camera that records 5.7K video. This camera should allow the option to record 360 degree or 180 degree 3D by altering the position of the lenses. Other cameras such as the Qoocam Kandoa offer similar, but the latter is a 4K camera. Cameras like as the Insta360 Pro can record at 8K which clearly improves clarity, but equally increase processing time and memory overhead.
Summary
Filming virtual reality content requires dedication and does come with pitfalls. What makes it worth it, however, is seeing the reaction of those using the content. Giving someone the option of experiencing an environment realistically and immersively, will hopefully start replacing a much over-used phenomenon in healthcare, the ever-present patient information leaflet.
Dr Mark Taubert’s plenary lecture at the Cardiff Wales Deanery STEME conference 2018 can be seen here.